-
Spring Security와 Oauth 2.0으로 로그인 구현하기(SpringBoot + React)프로젝트/WebRTC 화상통화 프로젝트 2022. 7. 19. 02:55반응형
(2) Spring Security와 OAuth 2.0으로 로그인 구현하기(SpringBoot + React)
(3) Spring Security OAuth 2.0 단위테스트
(4) Spring Security가 OAuth 로그인을 처리하는 방법
(5) Sign In with Apple REST API 문서 정리
이해하는데 도움이 되는 개념들
- Spring Boot
- Oauth 2.0 Flow에 대한 이해
- 인증/인가에 대한 이해
- 간단한 JPA 지식
다음과 같은 내용을 다루고 있습니다.
- 이 방식은 REST API 통신으로는 적절하지 않습니다(HTTP Status 등으로 통신하지 않고 redirect를 통하여 데이터를 주고받습니다)
- Spring Security와 OAuth2.0으로 네이버,카카오,구글 로그인 구현
- 클라이언트에게 로그인정보를 반환하기 위한 Controller 만들기, 혹은 Spring Security의 SuccessHandler 활용
- DB와 연동해서 로그인정보 저장하기(DB 연동은 하실줄 안다는 가정하에 진행됩니다)
- 게시글을 업데이트하면서 더 자세한 내용을 쉽게 전달드리기 위해 자바, 코틀린의 코드가 혼합으로 등장하지만 워낙 유사하기 때문에 쉽게 이해하실 수 있을것 같습니다.
만약 DB연동을 모르신다면 다음글을 참고하세요
https://junuuu.tistory.com/409?category=1014988
프로젝트 생성하기(Spring Boot + MySQL + Spring Data JPA)
1. Spinrg initializr를 통해서 프로젝트를 생성하기. https://start.spring.io/ Proejct : Gradle Project Language : Java Packaging : Jar(REST API server로 만들기 때문에 JSP필요 x) - Spring 문서에서도..
junuuu.tistory.com
Spring Security란?
스프링 시큐리티는 막강한 인증과 인가 기능을 가진 프레임워크입니다.
스프링 하위 프레임워크로 Filter를 활용하여 처리를 하고 있습니다.
Spring 기반 애플리케이션을 보호하기 위해 사실상 표준으로 사용됩니다.
Spring Security의 장점
굳이 스프링 시큐리티가 없어도 필터와 인터셉터를 활용하여 인증/인가를 구현할 수 있습니다.
하지만 스프링 시큐리티를 사용하면 세션 고정, 클릭재킹, CRSF 등의 공격에 대해 보호해줍니다.
한마디로 보안적으로 크게 신경 쓰지 않아도 더 안전해지는 측면이 있습니다.
build.gradle에 security, oauth2-client 의존성 추가
//spring security
implementation("org.springframework.boot:spring-boot-starter-security")
implementation("org.springframework.security:spring-security-test")

//spring security oauth2 cleint
implementation ("org.springframework.boot:spring-boot-starter-oauth2-client")
spring security와 oauth2-client를 사용하기 위해 의존성을 추가합니다.
회원 도메인 생성
OAuth 로그인을 통해 얻어온 유저 정보를 매핑하기 위한 도메인입니다.
OAuth 로그인을 통해 name, email을 얻으려고 합니다.
package zipzong.zipzong.domain;

import lombok.AccessLevel;
import lombok.Builder;
import lombok.Getter;
import lombok.NoArgsConstructor;
import org.hibernate.annotations.DynamicUpdate;

import javax.persistence.*;

@NoArgsConstructor(access = AccessLevel.PROTECTED) //기본 생성자 만들어줌
@DynamicUpdate //update 할때 실제 값이 변경됨 컬럼으로만 update 쿼리를 만듬
@Entity //JPA Entity 임을 명시
@Getter //Lombok 어노테이션으로 getter
@Table(name = "member") //테이블 관련 설정 어노테이션
public class Member {
    @Id
    @GeneratedValue(strategy = GenerationType.IDENTITY)
    @Column(name = "member_id")
    private Long id;

    @Column(name = "name", nullable = false)
    private String name;

    @Column(name = "email", nullable = false)
    private String email;

    @Column(name = "provider", nullable = false)
    private String provider;

    @Column(name = "nickname", nullable = true, unique = true)
    private String nickname;

    @Builder //생성을 Builder 패턴으로 하기 위해서
    public Member(Long id, String name, String email, String provider, String nickname) {
        this.id = id;
        this.name = name;
        this.email = email;
        this.provider = provider;
        this.nickname = nickname;
    }


    public Member update(String name, String email) {
        this.name = name;
        this.email = email;
        return this;
    }
}
소셜 로그인 중 email과 provider를 통해 이미 생성된 사용자인지 처음 가입하는 사용자인지 판단합니다.
email과 provider를 둔 이유는 email의 경우는 중복될 수 있다고 판단했습니다.
예를 들면 구글에서는 A@naver.com과 같이 이메일 등록이 가능합니다.
이때 사용자 B가 A@naver.com이라는 이메일을 가지고 있다면 email만으로 서로 다른 사용자를 구분하지 못합니다.
따라서 email과 provider를 같이 사용하여 서로 다른 사용자를 구분하고자 합니다.
+로 다루면 좋을 내용
저는 여기서 더 나아가서 소셜로그인 인증 시 고유한 id과 provider를 같이 사용하는 것을 추천드립니다.
사유는 각 소셜로그인마다 고유한 id를 부여하는 것을 보장해 주며, email의 경우 유저가 임의로 변경할 수 있습니다.
예를 들어 고유한 id의 경우에는 naver는 json응답값의 response 하위에 id가 존재합니다.
MemberRepository 코드
package zipzong.zipzong.repository;

import org.springframework.data.jpa.repository.JpaRepository;
import zipzong.zipzong.domain.Member;

import java.util.Optional;

public interface MemberRepository extends JpaRepository<Member, Long> {
    Optional<Member> findByEmailAndProvider(String email, String provider);
}
findByEmailAndProvider 메서드를 통해 이미 생성된 사용자인지 처음 가입하는 사용자인지 판단합니다.
OAuth 서비스 등록(구글, 네이버, 카카오)
https://console.cloud.google.com/home/dashboard 로 접속하여 새 프로젝트를 만듭니다.
상단의 프로젝트 선택 생성

새 프로젝트
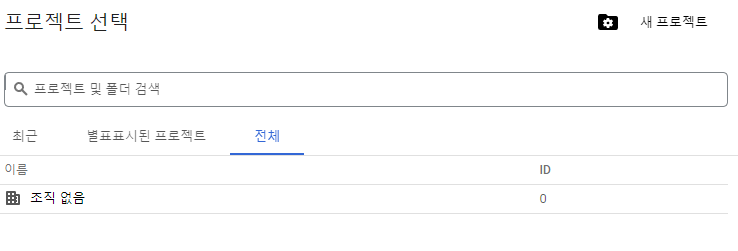
프로젝트 이름을 입력하고 조금 기다리면 프로젝트가 생성됩니다.
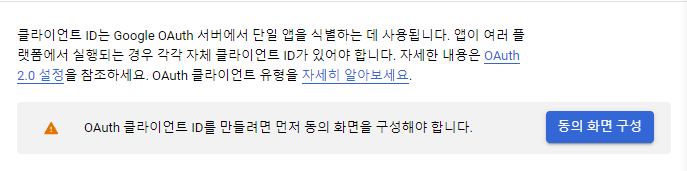
API 및 서비스를 클릭합니다.

사용자 인증 정보 -> 사용자 인증 정보 만들기 -> OAuth 클라이언트 ID를 클릭합니다.

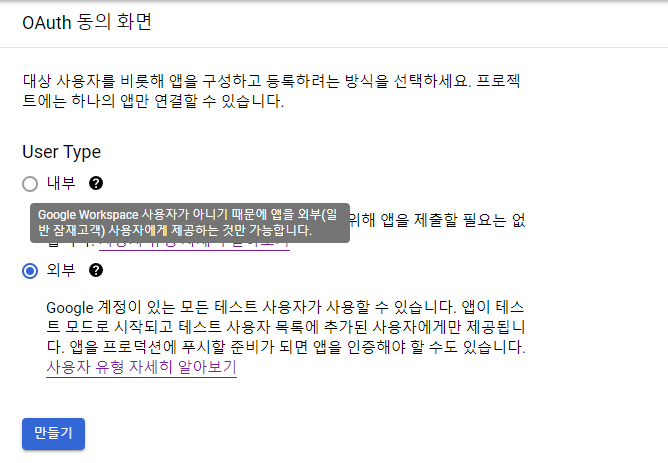
동의 화면 구성을 클릭합니다.
User Type을 외부로 설정하여 Google 계정이 있는 모든 사용자가 앱을 사용할 수 있도록 합니다.
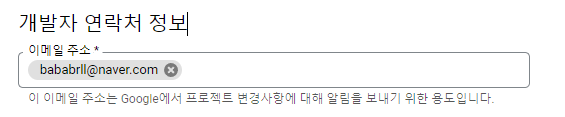
앱 정보를 입력합니다. 필수 정보만 입력하고 넘어가면 됩니다.

범위 추가 또는 삭제 선택
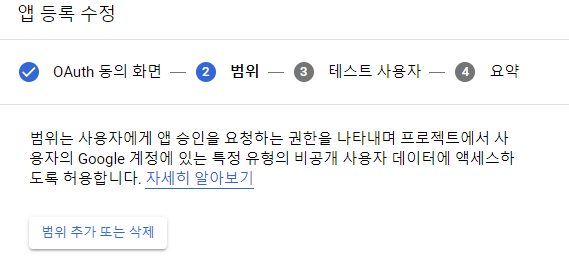
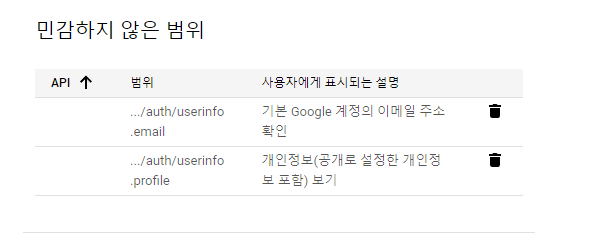
사용자의 email과 개인정보 정도만 필요할 것 같아 위와 같이 설정했습니다.
저장 후 계속 -> 테스트 사용자는 그대로 넘어갑니다.
사용자 인증 정보 -> 사용자 인증 정보 만들기 -> OAuth 클라이언트 ID를 클릭합니다.
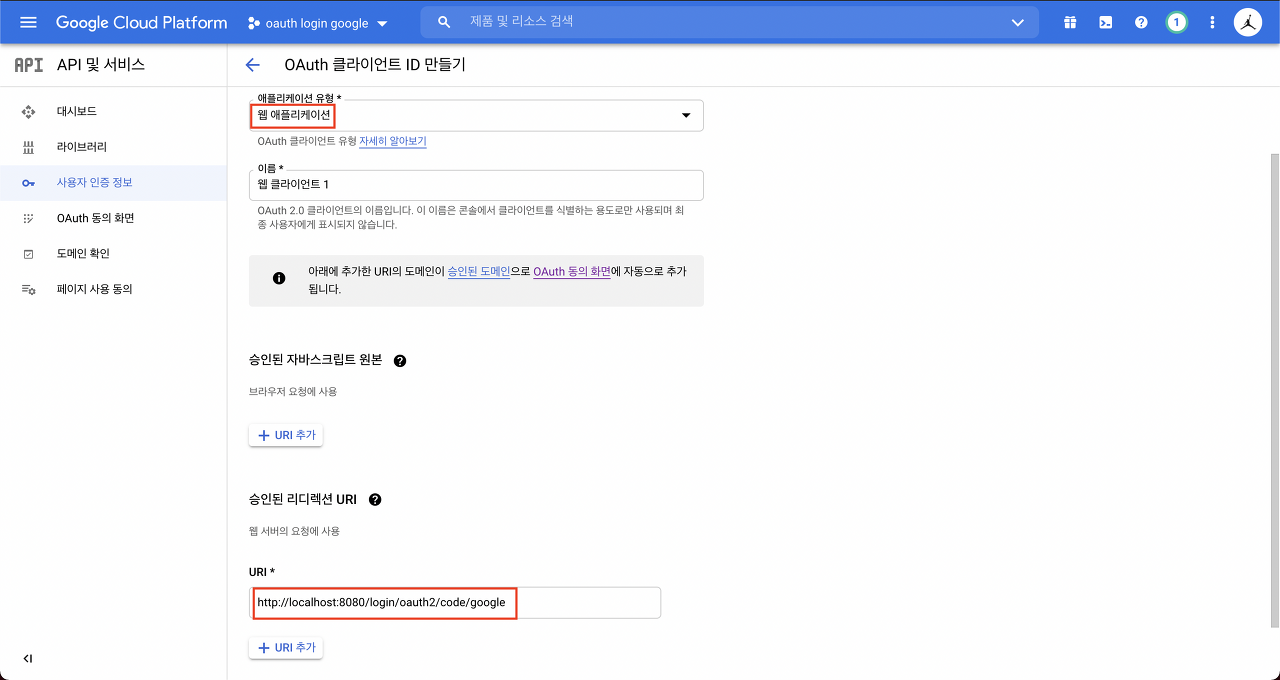
웹 애플리케이션을 클릭하면 리디렉션 URI 설정이 있습니다.
여기에 /login/oauth2/code/google을 적어줍니다.
이제 만들기 버튼을 누르면 클라이언트 ID와 클라이언트 보안 비밀번호를 알 수 있습니다.
application-oauth.properties 작성
여기에 클라이언트 ID와 클라이언트 보안 비밀 코드를 다음과 같이 등록합니다.
spring.security.oauth2.client.registration.google.client-id = 클라이언트 ID
spring.security.oauth2.client.registration.google.client-secret= 클라이언트 보안 비밀
spring.security.oauth2.client.registration.google.scope = profile, email
보통 많은 예제에서 scope를 별도로 등록하지 않습니다.
기본값에는 openid, profile, email이 포함되고 openid라는 scope가 존재하면 OpenId Provider로 인식됩니다.
이때 다른 네이버/카카오 등의 서비스를 추가하고 싶다면 OpenId Provider와 OAuth2 Service를 각각 만들어야 합니다.
따라서 하나의 OAuth2 Service로 사용하기 위해 일부러 openid scope를 빼고 등록합니다.
스프링 부트에서는 properties의 이름을 application-xxx.properties로 만들면 xxx라는 이름의 profile이 생성되어 관리할 수 있습니다.
application.properties에 다음과 같은 설정을 추가하면 oauth 설정을 사용할 수 있습니다.
spring.profiles.include=oauth스프링부트 2.0부터는 CommonOAuth2 Provider라는 enum이 추가되어 Google, Github, Facebook, Okta의 기본 설정 값들이 모두 제공되기 때문에 client에 관련된 정보들만 입력해 줘도 됩니다.
하지만 네이버, 카카오는 스프링에서 지원해주지 않기 때문에 입력해줘야 하는 입력값들이 구글보다 많습니다.
그리고 보안적으로 중요한 정보들이기 때문에 .gitignore를 통해 깃허브에 올라가지 않도록 잘 관리해야 합니다.
시큐리티 설정
이제 Oauth 라이브러리를 이용하여 소셜 로그인 설정 코드를 작성해야 합니다.
config.auth 패키지를 생성하여 시큐리티 관련 클래스를 모두 이곳에 담아줄 예정입니다.
SecurityConfig 클래스 생성
package zipzong.zipzong.config.auth;

import lombok.RequiredArgsConstructor;
import org.springframework.security.config.annotation.web.builders.HttpSecurity;
import org.springframework.security.config.annotation.web.configuration.EnableWebSecurity;
import org.springframework.security.config.annotation.web.configuration.WebSecurityConfigurerAdapter;

@EnableWebSecurity //spring security 설정을 활성화시켜주는 어노테이션
@RequiredArgsConstructor //final 필드 생성자 만들어줌
public class SecurityConfig extends WebSecurityConfigurerAdapter {
    private final OAuthService oAuthService;

    @Override
    protected void configure(HttpSecurity http) throws Exception {
        http
                .csrf().disable()//csrf 공격을 막아주는 옵션을 disalbe, rest api같은 경우에는 브라우저를 통해 request 받지 않기 때문에 해당 옵션을 꺼도 됩니다.
                .headers().frameOptions().disable()
                .and()
                .logout().logoutSuccessUrl("/") //logout 요청시 홈으로 이동 - 기본 logout url = "/logout"
                .and()
                .oauth2Login() //OAuth2 로그인 설정 시작점
                .defaultSuccessUrl("/oauth/loginInfo", true) //OAuth2 성공시 redirect
                .userInfoEndpoint() //OAuth2 로그인 성공 이후 사용자 정보를 가져올 때 설정 담당
                .userService(oAuthService); //OAuth2 로그인 성공 시, 작업을 진행할 MemberService
    }
}
위의 설정을 토대로 OAuth 성공시 /oauth/loginInfo에 @Controller를 만들어 front로 다시 redirect시킬 수 있습니다.
Deprecate 된 WebSecurityConfigureAdapter와 CORS 설정 추가
위의 방식은 WebSecurityConfigureAdapter를 활용하는 방법입니다.
하지만 WebSecurityConfigureAdapter는 Deprecate 되었으며 SecurityFilterChain을 Bean으로 등록하는 방식을 활용할 수 있습니다.
+로 cors 설정등이 빠져있는 것을 확인했습니다.
cors 설정을 하지 않으면 프론트엔드에서 호출 시 CORS 에러가 발생할 수 있습니다.
package com.kidsworld.auth.config

import com.kidsworld.auth.oauth.service.MyAuthenticationSuccessHandler
import com.kidsworld.auth.oauth.service.OAuthService
import org.springframework.context.annotation.Bean
import org.springframework.security.config.annotation.web.builders.HttpSecurity
import org.springframework.security.config.annotation.web.configuration.EnableWebSecurity
import org.springframework.security.config.http.SessionCreationPolicy
import org.springframework.security.web.SecurityFilterChain
import org.springframework.web.cors.CorsConfiguration
import org.springframework.web.cors.CorsConfigurationSource
import org.springframework.web.cors.UrlBasedCorsConfigurationSource


@EnableWebSecurity
class SecurityConfig(
    private val oAuthService: OAuthService,
){

    @Bean
    fun filterChain(http: HttpSecurity): SecurityFilterChain{
        http
            //CORS 설정
            .cors()
            .and()
            //Cross-Site-Request-Forgery 웹 브라우저가 신뢰할 수 없는 악성 사이트에서 사용자가 원치않는 작업을 수행하는 공격
            //쿠키에 의존하지 않고 OAuth2.0, JWT를 사용하는 REST API의 경우 CSRF 보호가 필요하지 않음
            .csrf().disable()
            //basic 인증방식은 username:password를 base64 인코딩으로 Authroization 헤더로 보내는 방식
            .httpBasic().disable()
            .formLogin().disable()
            //세션을 생성하지 않고, 요청마다 새로운 인증을 수행하도록 구성하는 옵션으로 REST API와 같은 환경에서 사용
            .sessionManagement().sessionCreationPolicy(SessionCreationPolicy.STATELESS)
            .and()
            //요청에 대한 인가 처리 설정
            .authorizeRequests()
            //인증되지 않은 사용자도 접근 가능하도록 허용 (로그인, 토큰발급에는 인증이 불필요)
            .anyRequest().permitAll()
            .and()
            //OAuth 2.0 기반 인증을 처리하기위해 Provider와의 연동을 지원
            .oauth2Login()
            //인증에 성공하면 실행할 handler (redirect 시킬 목적)
            .successHandler(MyAuthenticationSuccessHandler())
            //OAuth 2.0 Provider로부터 사용자 정보를 가져오는 엔드포인트를 지정하는 메서드
            .userInfoEndpoint()
            //OAuth 2.0 인증이 처리되는데 사용될 사용자 서비스를 지정하는 메서드
            .userService(oAuthService)
            .and()
        return http.build()
    }

    @Bean
    fun corsConfigurationSource(): CorsConfigurationSource {
        val configuration = CorsConfiguration()
        configuration.addAllowedOrigin("http://localhost:3000")
        configuration.addAllowedMethod("*")
        configuration.addAllowedHeader("*")
        configuration.allowCredentials = true
        val source = UrlBasedCorsConfigurationSource()
        source.registerCorsConfiguration("/**", configuration)
        return source
    }
}
Kotlin으로 작성되어 있는 코드인데 Java와 유사하기 때문에 참고하시면 좋을 것 같습니다.
Front-end의 port 번호를 3000으로 지정하였기 때문에 http://localost:3000을 허용하였습니다.
또한 successHandler를 사용하여 MyAuthenticationSuccessHandler를 구현하여 토큰을 발행하고, front-end에게 redirect 시킬 수 있습니다.
memberProfile 클래스 생성
package zipzong.zipzong.config.auth;

import lombok.Getter;
import lombok.Setter;
import zipzong.zipzong.domain.Member;

@Getter
@Setter
public class MemberProfile {
    private String name;
    private String email;
    private String provider;
    private String nickname;

    public Member toMember() {
        return Member.builder()
                     .name(name)
                     .email(email)
                     .provider(provider)
                     .build();
    }

}
닉네임은 null으로 비워두며 닉네임이 없는 경우 유저에게 입력받도록 합니다.
OAuthService 클래스 생성
package zipzong.zipzong.config.auth;

import lombok.RequiredArgsConstructor;
import org.springframework.security.core.authority.SimpleGrantedAuthority;
import org.springframework.security.oauth2.client.userinfo.DefaultOAuth2UserService;
import org.springframework.security.oauth2.client.userinfo.OAuth2UserRequest;
import org.springframework.security.oauth2.client.userinfo.OAuth2UserService;
import org.springframework.security.oauth2.core.OAuth2AuthenticationException;
import org.springframework.security.oauth2.core.user.DefaultOAuth2User;
import org.springframework.security.oauth2.core.user.OAuth2User;
import org.springframework.stereotype.Service;
import zipzong.zipzong.domain.Member;
import zipzong.zipzong.repository.MemberRepository;

import java.util.Collections;
import java.util.LinkedHashMap;
import java.util.Map;

/*
    OAuth2 로그인 성공시 DB에 저장하는 작업
 */
@Service
@RequiredArgsConstructor
public class OAuthService implements OAuth2UserService<OAuth2UserRequest, OAuth2User> {

    private final MemberRepository memberRepository;

    @Override
    public OAuth2User loadUser(OAuth2UserRequest userRequest) throws OAuth2AuthenticationException {
        OAuth2UserService delegate = new DefaultOAuth2UserService();
        OAuth2User oAuth2User = delegate.loadUser(userRequest); // OAuth 서비스(kakao, google, naver)에서 가져온 유저 정보를 담고있음

        String registrationId = userRequest.getClientRegistration()
                                           .getRegistrationId(); // OAuth 서비스 이름(ex. kakao, naver, google)
        String userNameAttributeName = userRequest.getClientRegistration()
                                                  .getProviderDetails()
                                                  .getUserInfoEndpoint()
                                                  .getUserNameAttributeName(); // OAuth 로그인 시 키(pk)가 되는 값
        Map<String, Object> attributes = oAuth2User.getAttributes(); // OAuth 서비스의 유저 정보들

        MemberProfile memberProfile = OAuthAttributes.extract(registrationId, attributes); // registrationId에 따라 유저 정보를 통해 공통된 UserProfile 객체로 만들어 줌
        memberProfile.setProvider(registrationId);
        Member member = saveOrUpdate(memberProfile);

        Map<String, Object> customAttribute = customAttribute(attributes, userNameAttributeName, memberProfile, registrationId);

        return new DefaultOAuth2User(
                Collections.singleton(new SimpleGrantedAuthority("USER")),
                customAttribute,
                userNameAttributeName);

    }

    private Map customAttribute(Map attributes, String userNameAttributeName, MemberProfile memberProfile, String registrationId) {
        Map<String, Object> customAttribute = new LinkedHashMap<>();
        customAttribute.put(userNameAttributeName, attributes.get(userNameAttributeName));
        customAttribute.put("provider", registrationId);
        customAttribute.put("name", memberProfile.getName());
        customAttribute.put("email", memberProfile.getEmail());
        return customAttribute;

    }

    private Member saveOrUpdate(MemberProfile memberProfile) {

        Member member = memberRepository.findByEmailAndProvider(memberProfile.getEmail(), memberProfile.getProvider())
                                        .map(m -> m.update(memberProfile.getName(), memberProfile.getEmail())) // OAuth 서비스 사이트에서 유저 정보 변경이 있을 수 있기 때문에 우리 DB에도 update
                                        .orElse(memberProfile.toMember());

        return memberRepository.save(member);
    }


}
loadUser 메서드 설명
Spring Security가 access token을 이용해서 OAuth2 Server에서 유저 정보를 가져온 다음 loadUser 메서드를 통해 유저의 정보를 가져옵니다.
saveOrUpdate 메서드 설명
Email과 Provider를 기준으로 member를 찾아옵니다.
이때 Optional으로 찾아오기 때문에 만약 값이 null이라면 Optional의 orElse 메서드를 통해 memberProfile에 저장된 값을 member로 만들어서 반환합니다.
만약 값이 null이 아니라면 이미 존재하는 회원이므로 이름과 이메일이 갱신되었는지만 업데이트해 줍니다.
이후에는 최종적으로 DB에 member를 저장해 주면 업데이트 혹은 생성이 됩니다.
OAuthAttributes.extract 메서드 설명
밑에서 자세하게 설명하겠지만 OAuthAttributes는 enum 타입으로 이루어져 있습니다.
registrationId에 따라 (구글, 네이버, 카카오) attributes에 있는 정보들을 추출하여 memberProfile으로 반환합니다.
각각의 registrationId에 따라서 attributes의 정보들, 즉 유저의 정보를 반환해 주는 JSON이 다르기 때문에 필요한 메서드입니다.
DefaultOAuth2User 설명
OAuth2USer의 기본 구현입니다.
OAuth2User는 OAuth2.0 표준 사용자를 나타내며 사용자의 이름, 이메일, 전화번호, 주소와 같은 하나 이상의 속성으로 구성됩니다.
이때 OAuth2User가 공급자들(카카오, 네이버, 구글) 간에 표준화되지 않았으므로 다양합니다.
따라서 DefaultOAuth2User라는 표준을 만들어서 제공합니다.
DefaultOAuth2User에서 customAttribute를 반환하는 이유는 기존에 oAuth2User.getAttributes()에서 받아온 정보들은 unmodifableMap입니다.
즉, 정보를 수정할 수 없는 Map이기 때문에 attribute.put("provider", registrationId)를 하려면 수정할 수 없다면 Exception이 발생하게 됩니다.
비즈니스 로직에 따라 provider가 필요했기 때문에 필요한 정보들만 추출해서 제공하기 위해 customAttribute를 만들어서 반환합니다.
이후 DefaultOAuth2User의 정보들은 REST API로 클라이언트에 정보를 보내기 위해 Controller에서 사용할 예정입니다.
OAuthAttributes 클래스 생성
package zipzong.zipzong.config.auth;

import java.util.Arrays;
import java.util.Map;
import java.util.function.Function;

public enum OAuthAttributes {
    GOOGLE("google", (attributes) -> {
        MemberProfile memberProfile = new MemberProfile();
        memberProfile.setName((String) attributes.get("name"));
        memberProfile.setEmail((String) attributes.get("email"));
        return memberProfile;
    }),

    NAVER("naver", (attributes) -> {
        Map<String, Object> response = (Map<String, Object>) attributes.get("response");
        System.out.println(response);
        MemberProfile memberProfile = new MemberProfile();
        memberProfile.setName((String) response.get("name"));
        memberProfile.setEmail(((String) response.get("email")));
        return memberProfile;
    }),

    KAKAO("kakao", (attributes) -> {
        // kakao는 kakao_account에 유저정보가 있다. (email)
        Map<String, Object> kakaoAccount = (Map<String, Object>) attributes.get("kakao_account");
        // kakao_account안에 또 profile이라는 JSON객체가 있다. (nickname, profile_image)
        Map<String, Object> kakaoProfile = (Map<String, Object>)kakaoAccount.get("profile");

        MemberProfile memberProfile = new MemberProfile();
        memberProfile.setName((String) kakaoProfile.get("nickname"));
        memberProfile.setEmail((String) kakaoAccount.get("email"));
        return memberProfile;
    });

    private final String registrationId;
    private final Function<Map<String, Object>, MemberProfile> of;

    OAuthAttributes(String registrationId, Function<Map<String, Object>, MemberProfile> of) {
        this.registrationId = registrationId;
        this.of = of;
    }

    public static MemberProfile extract(String registrationId, Map<String, Object> attributes) {
        return Arrays.stream(values())
                .filter(provider -> registrationId.equals(provider.registrationId))
                .findFirst()
                .orElseThrow(IllegalArgumentException::new)
                .of.apply(attributes);
    }
}
OAuthAttributes는 enum 입니다.
속성으로는 registrationID와 Function<Map<String, Object>, MemberProfile> of를 가집니다.
이때 Function은 람다식을 활용하기 위한 FunctionalInterface입니다.
google, naver, kakao에서 주는 JSON 형식들이 모두 다르기 때문에 따로 관리해줍니다.
위의 방식이 너무 추상적이라 이해가 잘 안된다고 느껴지시면 switch case로 registrationId로 분기처리해도 무관합니다.
extract 메서드 설명
values()는 enum의 요소들을 순서대로 배열에 리턴해줍니다.
이를 stream으로 만들어주고 provider가 일치하는 경우에만 filter해줍니다. (if문으로 생각하시면됩니다)
이후 .findFirst()로 하나를 찾아주는데 만약 일치하는게 없다면 orElseThow 메서드를 통해 IllegalArgumentException을 발생시킵니다.
일치하는게 존재한다면 Function의 추상메서드인 apply를 호출하여 (google,naver,kakao) 형식에 맞춰 MemberProfile을 만들어서 반환합니다.
OAuthController 클래스 생성
package zipzong.zipzong.controller;

import org.springframework.security.core.Authentication;
import org.springframework.security.core.annotation.AuthenticationPrincipal;
import org.springframework.security.oauth2.core.user.OAuth2User;
import org.springframework.ui.Model;
import org.springframework.web.bind.annotation.GetMapping;
import org.springframework.web.bind.annotation.ModelAttribute;
import org.springframework.web.bind.annotation.RequestMapping;
import org.springframework.web.bind.annotation.RestController;

import java.util.Map;

@RestController
@RequestMapping("/oauth")
public class OAuthController {

    @GetMapping("/loginInfo")
    public String oauthLoginInfo(Authentication authentication){
        //oAuth2User.toString() 예시 : Name: [2346930276], Granted Authorities: [[USER]], User Attributes: [{id=2346930276, provider=kakao, name=김준우, email=bababoll@naver.com}]
        OAuth2User oAuth2User = (OAuth2User) authentication.getPrincipal();
        //attributes.toString() 예시 : {id=2346930276, provider=kakao, name=김준우, email=bababoll@naver.com}
        Map<String, Object> attributes = oAuth2User.getAttributes();
        return attributes.toString();
    }
}
Spring Security에서 현재 인증된 사용자의 정보를 가져오는 방법들을 소개하겠습니다.
1. Bean에서 사용자 정보 얻기 (전역에 선언된 SecurityContextHoler를 이용해서 가져오기)
2. 컨트롤러에서 Principal 객체, authentication, @AuthenticationPricipal 으로 가져오기
여기서는 인증 토큰이라 불리는 authentication 방법을 선택하여 사용하였습니다.
authentication은 인증 토큰이라 불립니다.
authentication에서 정보를 추출하여 Client에게 반환합니다.
MyAuthenticationSuccessHandler를 구현할것이라면?
@Component
class MyAuthenticationSuccessHandler: AuthenticationSuccessHandler {
    override fun onAuthenticationSuccess(
        request: HttpServletRequest,
        response: HttpServletResponse,
        authentication: Authentication
    ) {
        val oAuth2User = authentication.principal as OAuth2User
        println("SuccessHandler oAuth2User: $oAuth2User")

        response.sendRedirect(UriComponentsBuilder.fromUriString(REDIRECT_URI)
            .queryParam("accessToken", "accessToken")
            .queryParam("refreshToken", "refreshToken")
            .build()
            .encode(StandardCharsets.UTF_8)
            .toUriString())
    }

    companion object{
        const val REDIRECT_URI = "http://localhost:3000/logincheck"
    }
}
주의해야 할 점은 sendRedirect가 호출되면 바로 redirect가 일어나지 않고 코드가 끝까지 실행됩니다.
예를 들어 sendRedirect를 호출하는 부분이 2부분이라면 (성공 redirect, 실패 redirect) 꼭 if-else로 분기를 해야 500 Cannot call sendRedirect() 예외가 발생하지 않습니다.
reousrces -> static -> index.html 파일 생성
<!DOCTYPE html>
<html lang="en">
<head>
    <meta charset="UTF-8">
    <title>구글 로그인</title>
</head>
<body>
<a href="/oauth2/authorization/google" class="btn btn-sm btn-success active" role="button">Google Login</a><br>
<a href="/oauth2/authorization/naver" class="btn btn-sm btn-success active" role="button">Naver Login</a><br>
<a href="/oauth2/authorization/kakao" class="btn btn-third active" role="button">Kakao Login</a>

</body>
</html>
로그인이 잘 되는지 확인하기 위해서 index.html 파일을 하나 생성해줍니다.
스프링 시큐리티를 사용하면 /oauth2/authorization/{OAuth 서비스 이름} 형식으로 요청만 보내면 알아서 다 해결해줍니다.
프론트엔드에서도 위와 같이 href를 활용하여 백엔드로 호출할 수 있습니다
예시: <a href="localhost:8080/oauth2/authorization/naver">네이버 로그인</a>
다음은 테스트 후 DB 내용입니다.

구글 로그인 테스트 후 DB에 저장됨 nickName은 아직 설정해주지 않아 null으로 남아있습니다.
추후에 프런트에서 nickName이 null인 유저는 nickName을 입력받는 창으로 넘어가도록 설계하시면 될 것 같습니다.
6. 네이버 로그인 추가
네이버 오픈 API로 이동합니다.
https://developers.naver.com/apps/#/register?api=nvlogin
애플리케이션 이름과 사용 API를 선택합니다.

환경은 PC웹을 선택하고 서비스 URL은 다음과 같이 입력해줍니다.
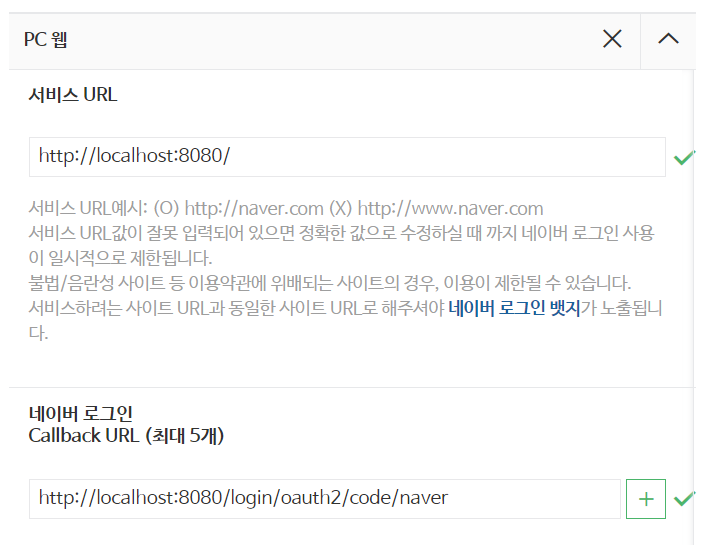
네이버 서비스 등록을 완료하면 Client ID와 Secret을 발급받습니다.
application-oauth.properties에 해당 값들을 등록합니다.
#Naver
spring.security.oauth2.client.registration.naver.client-id=클라이언트 ID
spring.security.oauth2.client.registration.naver.client-secret=클라이언트 비밀
spring.security.oauth2.client.registration.naver.redirect-uri=http://localhost:8080/login/oauth2/code/naver
spring.security.oauth2.client.registration.naver.authorization-grant-type=authorization_code
spring.security.oauth2.client.registration.naver.scope=name,email,profile_image
spring.security.oauth2.client.registration.naver.client-name=Naver
#Provider-Naver
spring.security.oauth2.client.provider.naver.authorization-uri=https://nid.naver.com/oauth2.0/authorize
spring.security.oauth2.client.provider.naver.token-uri=https://nid.naver.com/oauth2.0/token
spring.security.oauth2.client.provider.naver.user-info-uri=https://openapi.naver.com/v1/nid/me
spring.security.oauth2.client.provider.naver.user-name-attribute=response
이후에는 OAuthAttributes에 NAVER enum을 세팅해주면 끝입니다.
  NAVER("naver", (attributes) -> {
        Map<String, Object> response = (Map<String, Object>) attributes.get("response");
        System.out.println(response);
        MemberProfile memberProfile = new MemberProfile();
        memberProfile.setName((String) response.get("name"));
        memberProfile.setEmail(((String) response.get("email")));
        return memberProfile;
    });
7. 카카오 로그인 추가
카카오 Developes 사이트로 이동합니다.
Kakao Developers
카카오 API를 활용하여 다양한 어플리케이션을 개발해보세요. 카카오 로그인, 메시지 보내기, 친구 API, 인공지능 API 등을 제공합니다.
developers.kakao.com
1단계 내 애플리케이션 -> 애플리케이션 추가하기 -> 앱 이름 입력 -> 사업자명 입력 -> 저장
2단계 REST API 키를 어디에 기록해 둡니다.
만약 보안을 더 신경 쓰고 싶다면 좌측 Navbar에서 보안 -> Client Secret을 사용할 수 있습니다

REST API인 경우에 해당됩니다.
3단계 플랫폼 설정하기 -> 웹 플랫폼 등록 -> 웹 URL 입력 (http://localhost:8080)
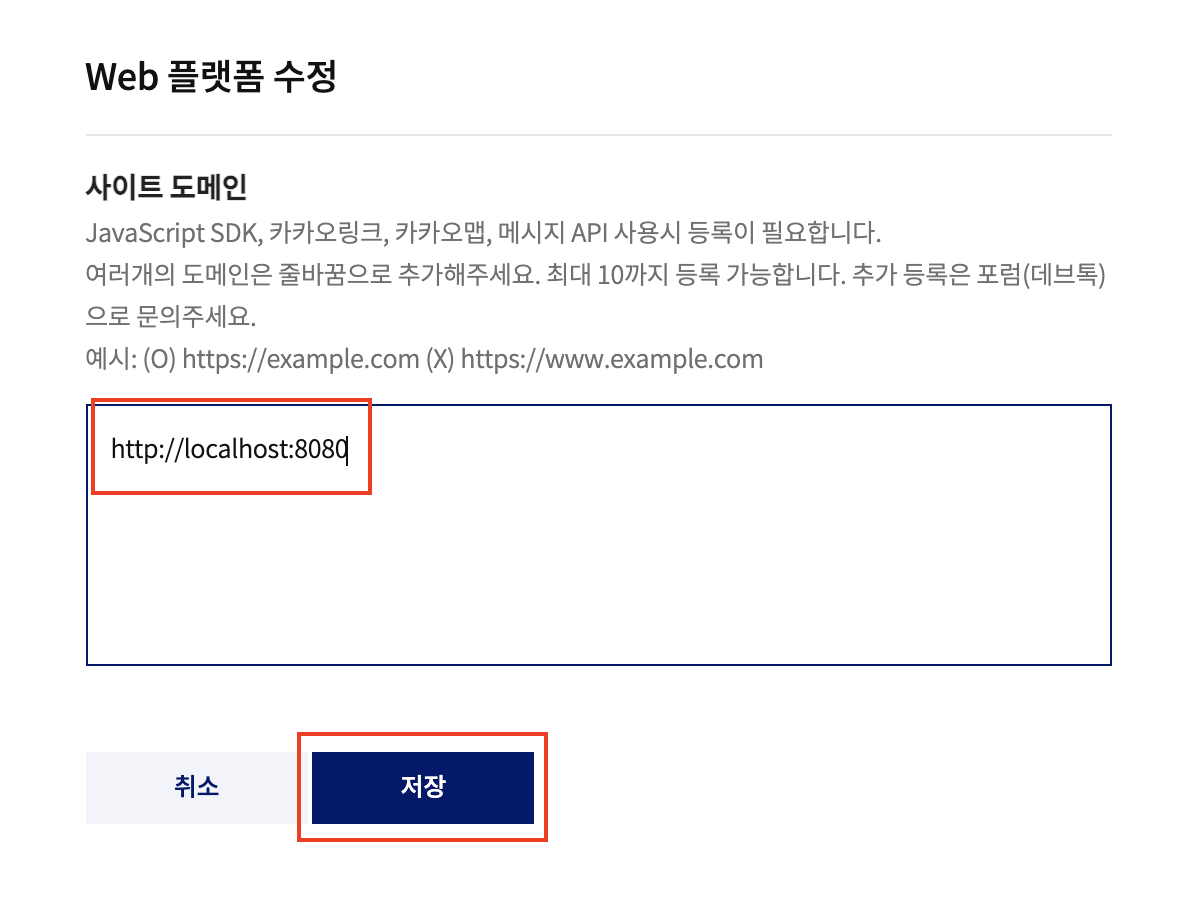
4단계 Redirect URL 등록하러 가기 -> Redirect URI(http://localhost:8080/login/oauth2/code/kakao)


5단계 좌측 Navbar 동의 항목 -> 닉네임, 프로필 사진, 이메일 수집

이메일의 경우에는 필수로 입력받기 위해 검수가 필요합니다.
서비스를 배포할 때 고려해야 할 것 같습니다.
6단계 application-oauth.properties에 설정 정보 입력
#Kakao
spring.security.oauth2.client.registration.kakao.client-id=클라이언트 ID
spring.security.oauth2.client.registration.kakao.redirect-uri=http://localhost:8080/login/oauth2/code/kakao
spring.security.oauth2.client.registration.kakao.client-authentication-method=POST
spring.security.oauth2.client.registration.kakao.authorization-grant-type = authorization_code
spring.security.oauth2.client.registration.kakao.scope=profile_nickname, profile_image, account_email
spring.security.oauth2.client.registration.kakao.client-name=Kakao
#Provider-Kakao
spring.security.oauth2.client.provider.kakao.authorization-uri=https://kauth.kakao.com/oauth/authorize
spring.security.oauth2.client.provider.kakao.token-uri=https://kauth.kakao.com/oauth/token
spring.security.oauth2.client.provider.kakao.user-info-uri=https://kapi.kakao.com/v2/user/me
spring.security.oauth2.client.provider.kakao.user-name-attribute=id
클라이언트 ID에는 REST API 키를 적으면 됩니다.
이후에는 OAuthAttributes에 KAKAO enum을 세팅해주면 끝입니다.
    KAKAO("kakao", (attributes) -> {
        // kakao는 kakao_account에 유저정보가 있다. (email)
        Map<String, Object> kakaoAccount = (Map<String, Object>) attributes.get("kakao_account");
        // kakao_account안에 또 profile이라는 JSON객체가 있다. (nickname, profile_image)
        Map<String, Object> kakaoProfile = (Map<String, Object>)kakaoAccount.get("profile");

        MemberProfile memberProfile = new MemberProfile();
        memberProfile.setName((String) kakaoProfile.get("nickname"));
        memberProfile.setEmail((String) kakaoAccount.get("email"));
        return memberProfile;
    });
Spring Boot + React
SuccessHandler를 활용하여 프론트 페이지로 redirect 시킬 수 있습니다.
        response.sendRedirect(UriComponentsBuilder.fromUriString("http://localhost:3000/login/callback")
            .queryParam("accessToken", "accessToken")
            .queryParam("refreshToken", "refreshToken")
            .build()
            .encode(StandardCharsets.UTF_8)
            .toUriString())
http://localhost:3000/login 은 react에서 로그인 성고후 redirect를 받을 페이지를 의미합니다.
react의 /login/callback 페이지에 accessToken, refreshToken등의 필요한 정보를 쿼리스트링 방식으로 보냅니다.
리엑트에서는 다음과 같이 받을 수 있습니다.
const token = new URL(window.location.href).searchParams.get("accessToken")
const refreshToken = new URL(window.location.href).searchParams.get("refreshToken")

if (token) {
    localStorage.setItem("token", token)
    localStorage.setItem("refreshToken", refreshToken)
  }
개발자 도구로 분석하는 통신과정
localhost:9000 = Back
localhost:3000 = Front
프론트엔드에서 하이퍼링크를 클릭Request URL http://localhost:9000/oauth2/authorization/naver Status Code 302사용자가 보는 소셜 로그인 페이지Request URL https://nid.naver.com/oauth2.0/authorize?response_type=code&client_id=Zef1pJjpqOwG_zvpgrHS&scope=email&state=hQ4ihYxcYqdp8JczswryqEiL_PiLLcGX85PwsN4qU_s%3D&redirect_uri=http://localhost:9000/login/oauth2/code/naver Status Code 200사용자가 소셜 로그인 성공후 302 redirect로 code와 state를 받아옴Request URL http://localhost:9000/login/oauth2/code/naver?code=odbUYRU89bo6odJirw&state=hQ4ihYxcYqdp8JczswryqEiL_PiLLcGX85PwsN4qU_s= Status Code 302백엔드 에서 내부적으로 일어나는 일백엔드에서 code를 access token으로 바꿔오고 회원도메인에 회원 정보 조회 실패하는 경우에는 저장후 redirect프로트엔드에서 callback 받을 url(Request URL) (성공시엔 token 반환)Request URL http://localhost:3000/login/callback?accesstoken=accesstoken&refreshtoken=refreshtoken Status Code 200출처
https://spring.io/projects/spring-security
Spring Security
Spring Security is a framework that focuses on providing both authentication and authorization to Java applications. Like all Spring projects, the real power of Spring Security is found in how easily it can be extended to meet custom requirements
spring.io
https://www.baeldung.com/spring-security-5-oauth2-login
Spring Security 5 - OAuth2 Login | Baeldung
Learn how to authenticate users with Facebook, Google or other credentials using OAuth2 in Spring Security 5.
www.baeldung.com
https://velog.io/@max9106/OAuth2
[OAuth + Spring Boot + JWT] 2. 스프링 시큐리티로 OAuth 구현해보기
이번에는 \[OAuth + Spring Boot + JWT] 1. OAuth란? 프론트엔드와 백엔드의 역할 마지막에 설명한 구조를 스프링 시큐리티 없이 구현하기 앞서 스프링 시큐리티를 사용해서 oauth를 구현해보려고 한다.👀
velog.io
Deprecated된 WebSecurityConfigurerAdapter, 어떻게 대처하지?
스프링 버전이 업데이트 됨에 따라 WebSecurityConfigurerAdapter와 그 외 몇 가지들이 Deprecated 됐습니다.스프링에서는 다른 방식으로 시큐리티 설정을 권장하고 있는 듯 해보였는데요. 방식이 바뀐 탓
velog.io
[Spring Security] OAuth 구글 로그인하기
목차 [이전 게시글] 꼭! 봐주세여 [Spring Security] 동작방법 및 Form, OAuth 로그인하기 (Feat.Thymeleaf 타임리프) 목차 Spring Security란? Spring을 사용할 때 애플리케이션에 대한 인증, 권한 부여 등의 보..
lotuus.tistory.com
https://loosie.tistory.com/302?category=932704
[Spring] 스프링으로 OAuth2 로그인 구현하기3 - 카카오
1. 카카오 API 서비스 등록 1) 카카오 Devlopes 사이트로 이동한다. 링크 Kakao Developers 카카오 API를 활용하여 다양한 어플리케이션을 개발해보세요. 카카오 로그인, 메시지 보내기, 친구 API, 인공지능
loosie.tistory.com
[Spring Security] 현재 로그인한 사용자 정보 가져오기
Spring Security 에서 현재 인증된(로그인한) 사용자의 정보를 가져오는 방법 에 대해 살펴볼 것 입니다. 스프링의 다양한 메카니즘을 통해 현재 로그인 중인 사용자의 정보를 가져올 수 있는데, 대
itstory.tk
.
'프로젝트 > WebRTC 화상통화 프로젝트' 카테고리의 다른 글
Spring Rest Docs 적용하기 (0) 2022.07.21 Spring Security Oauth2.0 로그인 단위테스트 (0) 2022.07.20 ERD 설계하기 (0) 2022.07.17 프로젝트 생성하기(Spring Boot + MySQL + Spring Data JPA) (0) 2022.07.16 OAuth2.0 이란? (0) 2022.07.15